Saturday, 10 October 2015

A friend with teak is a friend indeed

A friend has proposed to me a bunch of teak strips (to use his words) he had laying around at his workshop since a while.
It turns out the bunch of strips are actually two half decks off a Riva like runabout project that was never finished.
They measure roughly 1.7 x 4 m, and consist of teak and elm strips  glued to a sheet of marine ply. The whole professionally assembled and brand new. The whole lot offered to me pretty cheap. Thank you Vassilis, it'll be great help for my boat project.


I'm trying to step up the gears as the countdown to next year's VeLa raid in Venice has started and I have committed myself to participate with the Pathfinder. Sure, the paint will be still sticky the day we get there in mid May 2016.

The teak decks I have got from Vassilis will be used to line the cockpit floor and the forward bunkflat.


Tuesday, 6 October 2015

One mobile phone down .... work carries on

Despite the loss of my mobile phone containing several pictures of the ongoing progress of my Pathfinder build, work has carried on.
Photographic evidence of spiling and fitting the benches is lost however here's some photos of the latest developments:
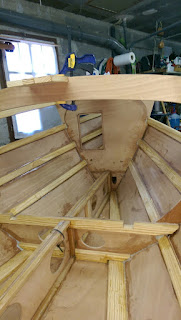
- the forward deck beams are epoxied and screwed in place


- and here's a picture of the (to use a Formula 1 expression) power unit of the boat.


Instead of a standard transom hung outboard (which is unsightly to me on this kind of boat) or an outboard in a well, I opted for an own made inboard solution. The donor motor is a 1975 evinrude 4hp two stroke outboard. It is coupled to a honda 5 hp outboard gearbox and case through a belt and pulley arrangement.

The idea is to reproduce the concept of a sail drive, where the former honda gearcase will be built into the boats keel. A brass impeller pump is driven by gears from the gearbox shaft.

All components and parts were sourced rather cheaply on ebay while the motor itself was found in the trash bin of a small boatyard.

First power up of the modified engine in the boat worked really well. The adaptation work involved building an adapter flange, adding a shaft and bearings, belt and pulleys and an exhaust manifold. The engine itself received quite a lot of attention as well: new head gasket, coil, breakers and condenser and rebuilt carburettor. I have adapted the flywheel and recoil started from another similar aged evinrude outboard I order to keep the motor's height within the height of the main benches. The motor will be fully enclosed a watertight aft compartment not exceeding the height of the cockpit seats.

Being a small twin cylinder the motor is really quiet. It starts like a charm after I've adjusted the timing accurately.


Thursday, 13 August 2015

Planking week!

An unexpected situation at work meant that the technical sea trials I should have attended for testing an underwater vehicle have been postponed. The holiday planning having been finalised beforehand this offered the unique opportunity of taking some prolonged time off at home. This would have been a first time experience of spending a week off at home as we always travel through Europe to see the family at every holiday break.
I decided therefore to declare an "all in" on the boatbuilding project and with the planks for my pathfinder already been CNC cut since day 2 of the project and looming at me from the shelves beside the boat, "Planking week" was given a clear for take off signal.

The planks are already cut to measure and take into account the required width of the clinker overlap. No spiling off the boat frame required. Given the size of the original ply sheet they are composed of three lengths, two roughly equal ones of around 2.2m and a third much shorter one. The joint is made with puzzle joints so no need for cutting scarfs. Easy!


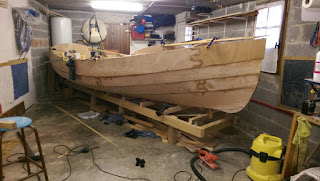
Planking the whole boat took exactly 6 days, lots of epoxy and great lengths of time staring at the growing hull in the evening after cleaning up. It was nice to see the pile of planking material getting thinner by the day as for the first time in this project I was given the ultimate luxury of time to work on it.

The planks went on very well, matching the shape of the boat traced in 3D by the frames and the stringers exactly as it was on the 3D CAD model the templates were generated from. The only surprise were some long  thin gaps appearing between the plank and the stringers towards the fore end of the boat. I initially thought that there was a problem with the bevels I had planed in the stringers and in the adjacent plank. I then realised that what I was seeing was perfectly normal as the relative angle between the planks becomes almost flat towards the bow of the boat and despite the bevel the thickness of the plank below the one being added makes the latter "come off" the stringer. I have filled the gaps with thin battens and thickened epoxy.


Sunday, 14 June 2015

A milestone

Plank #1 (starboard garboard) is fitted and glued! This is an important milestone in my poject as it proves that the plank shape that I had pre-cut by CNC waterjetting using 2D  templates derived from the 3D model of the hull is actually spot on!

I had pre-validated the plank shapes through a 1:8 scale model, however all through the building of the boat's frame I was wondering whether it would really work as well in 1:1 scale: the boat's length is such that a small error could lead to trouble.
In the "traditional" building method proposed by the designer, the planks are spiled from the boat's skeleton composed of the floor, the frames and stringers erected over a strongback. In my case the planks are cut even before any part of that skeleton even exists. The risk therefore is that small inaccuracies in setting up the boat's strongback, frames and stringers would bring to disaster when fitting 5.8m long planks; and would the 3D unrolling of the boat model to yield the 2D templates really work on the boat's full length?. One of my biggest fears was off course that a plank would fit at one end of the boat and then gradually diverge from its intended shape, both due to inaccuracies in the boat's frame or in the 3D -> 2D CAD conversion.
As I said the 1:8 scale model sure helped to reassure me and provided the grounds to proceed having the 950€ worth of plywood CNC cut.... however seeing the real thing, the garboard plank fitting nicely all along the boat's length, sitting to the millimiter on the stringer and respecting the intended overlap with the following plank is so great to see!
I now look at the ready cut planks and think to my self: this can go quite fast now!


Sunday, 7 June 2015

When the going gets tough ....

Many Pathfinder builders have commented on how daunting the task of beveling the stringers feels when one first approaches it. Undoubtedly as one fits one by one the 20x45 mm thick pine stringers, forcing them to fit into the notches in the frames, screwing, clamping, tying ropes , the mind also fast forwards to the following step of beveling them. And one wonders: how the heck am I going to do that ... ? The question applies mostly to the garboard stringer, the one fitted to the flat floor of the boat. That needs a lot of material taken off its original 20x70mm section to create a following angle all along the boat's length.
Some Pathfinder builders have called this step "the battle of the stringers" ... and one can clearly understand and share that denomination once the task of cleaning up the workshop after the beveling takes place.

The planks' stringers can beeasily taken care of by power planer followed by a hand plane, checking with a ruler/square edge along the way that the bevel angle is suitable for the plank to sit nicely.
The garboard stringer on the other hand requires a bit more of a hefty arsenal. In the following picture some of the tools I've thrown in the mix are shown...

The circular woodsaw fitted to the angle grinder may never belong in any good practice shown in an HSE manual however it allowed to "eat into" and cut through the stringer to a pencil line drawn beforehand. The line is drawn by fitting a flexible batten with clamps on the frame to reproduce the twist and orientation of plank #1.

Once the first cut is done, it is time to throw everything at it in order to separate the unwanted material: from chisels to handsaw to hammer.

In order to finish off the surface I folllowed other builders advice and used a sanding disk fitted to the angle grinder. An electric file was also handy to tackle those areas difficult to get at... mind you the whole problem in shaping  the garboard stringer is its accessibility or lack thereof.

Once it's done, it's done though and one can look forward to the exciting next step: planking!

Actually, I stand corrected. The following step is cleaning up the mess: wood chips and fine wood dust sprayed all over the place by the angle grinder....

Tuesday, 14 April 2015

Things over and under the sea ....

If one of my free time interests involves "things that go over the sea", such as the boat that is in the building and described in this blog, my professional activity leads me to explore what lies beneath the surface.
It was during one of these work appointments last month that I had the chance to dive an underwater vehicle over a fantastic archeological site.

These are the remainings of a roman ship that foundered near our coast around 2000 years ago. Its cargo of anphoraes still lined up as they were originally loaded indicates that the vessel sunk pretty much level.

Flying over these artifacts one's imagination runs fast .... and mine surely did. It was an incredible experience and naturally my thoughts went to the the people who built the ship, the anphorae and carried them around the mediterranean sea. The wreck site is a couple of miles from the coast and I do hope they managed it to dry land, however sadly the prospects for that happening are not that good.

Luckily for us today this is a protected (and deep) site therefore this beautiful display of craftmanship and endeavour will last for a few generations more....

Sunday, 1 March 2015

New wheels

I have recently acquired a new old trailer from an old new friend whom I met only a few months ago during the VeLa raid gathering in Venice. Felix is a thoroughly interesting man, an extremely kmowledgeable sailor and explorer of many iconic and less known places around the Mediterranean.
He's a great friend and extremely fun to be with.

I purchased this trailer from him and took it back to France where it originally came from. In its previous life the beast of a trailer, which measures 7.4 x 2.4 m (!) and has a load capacity of 1000kg, used to carry a fiberglass trimaran.

In its current form it is clearly to big for my future Pathfinder, however given its modular construction it is actually a very easy job to adapt it to the right length and width. A colleague from work has proposed help and a welder to do up the very few welds necessary for the project. I will tackle this soon!