Saturday, 26 March 2016

Bow to the king..... plank!


After days of slow progress today I finally
fitted the teak king plank to the foredeck.  What slowed down the progress was the required in situ bending and glueing of the teak strips along the deck.  The curved shape meant I could only glue two strips per day,  one each side, as clamps were needed to help hold the strips in place and keep the bend as the Epoxy cured.  The presence of the clamps prevented in most cases the next neighbouring strip to be glued at the same time.

Anyhow a milestone has been reached today as the king plank was finally laid down onto the deck.  Bow to the king....  As the focus now shifts to the coamings....

Friday, 4 March 2016

Teak side decks

The side decks have been successfully dressed with teak strips.... lots of bend and elastic energy but ... in epoxy we trust!

Sunday, 21 February 2016

Teak deck....episode 1

Work has started today on covering the deck with teak strips.
They will be glued down with Epoxy after a rub down and a cleanup with acetone.  I'm not too worried by the tricky adhesion of Epoxy to teak: I've glued similar strips in the past with positive results.  I think what helps is the low thickness of the strips (6mm) that limits the amount of wood that would work with temperature and moisture change.


I expected the strips to be harder to get hold of. I've purchased 60 linear meters of 35 mm wide strips : they should just about suffice however I fear another visit at the wood shop may be required to finish off the whole deck.
I've fitted today the first strip all around the deck.  The first one is probably the most fiddly to fit as it has to be placed flush with the gunwhale and there's no possibility to use a screws at the outer edge (the gunwhale end) as the holes will remain forever visible.  It was a matter therefore to dig out all the clamps in my possession and use them to grab hold of the task!


Deck and gunwhales are on

Progress on the boat has gone slightly undocumented recently.  Over the past weeks the deck has been fitted to the hull. 

 It is made of 6mm ply in the fore part and 9mm ply on the side decks and aft.  The aft deck also received a 10mm mahogany reinforcement beam underneath to improve stepping on firmness.  
The outer gunwhales are 40x20 mm mahogany scarfed to the length,  glued and screwed in place.  I've positioned them 6mm proud of the deck surface in preparation for the next phase: teak strip laying the deck.  
The strips will be 6mm thick an will therefore end up flush with the gunwhale... Lots of fun ahead! 

Monday, 1 February 2016

Foredeck planking

Here's the only photo I have of the Foredeck assembly process.  The Foredeck is composed of a 6mm ply sheet glued to the deck grounds underneath.  The teak strips decking is already glued to a thin ply sheet.  This is glued with slightly thickened epoxy to the 6mm sheet mentioned above (see picture). 
That makes a sandwich construction with Epoxy throughout which I hope will provide a tough and durable support. 
I yet do not know what product to apply to the teak strips. I've read of deks oliye n°1 saturation oil.  Any suggestion welcome! 

Saturday, 23 January 2016

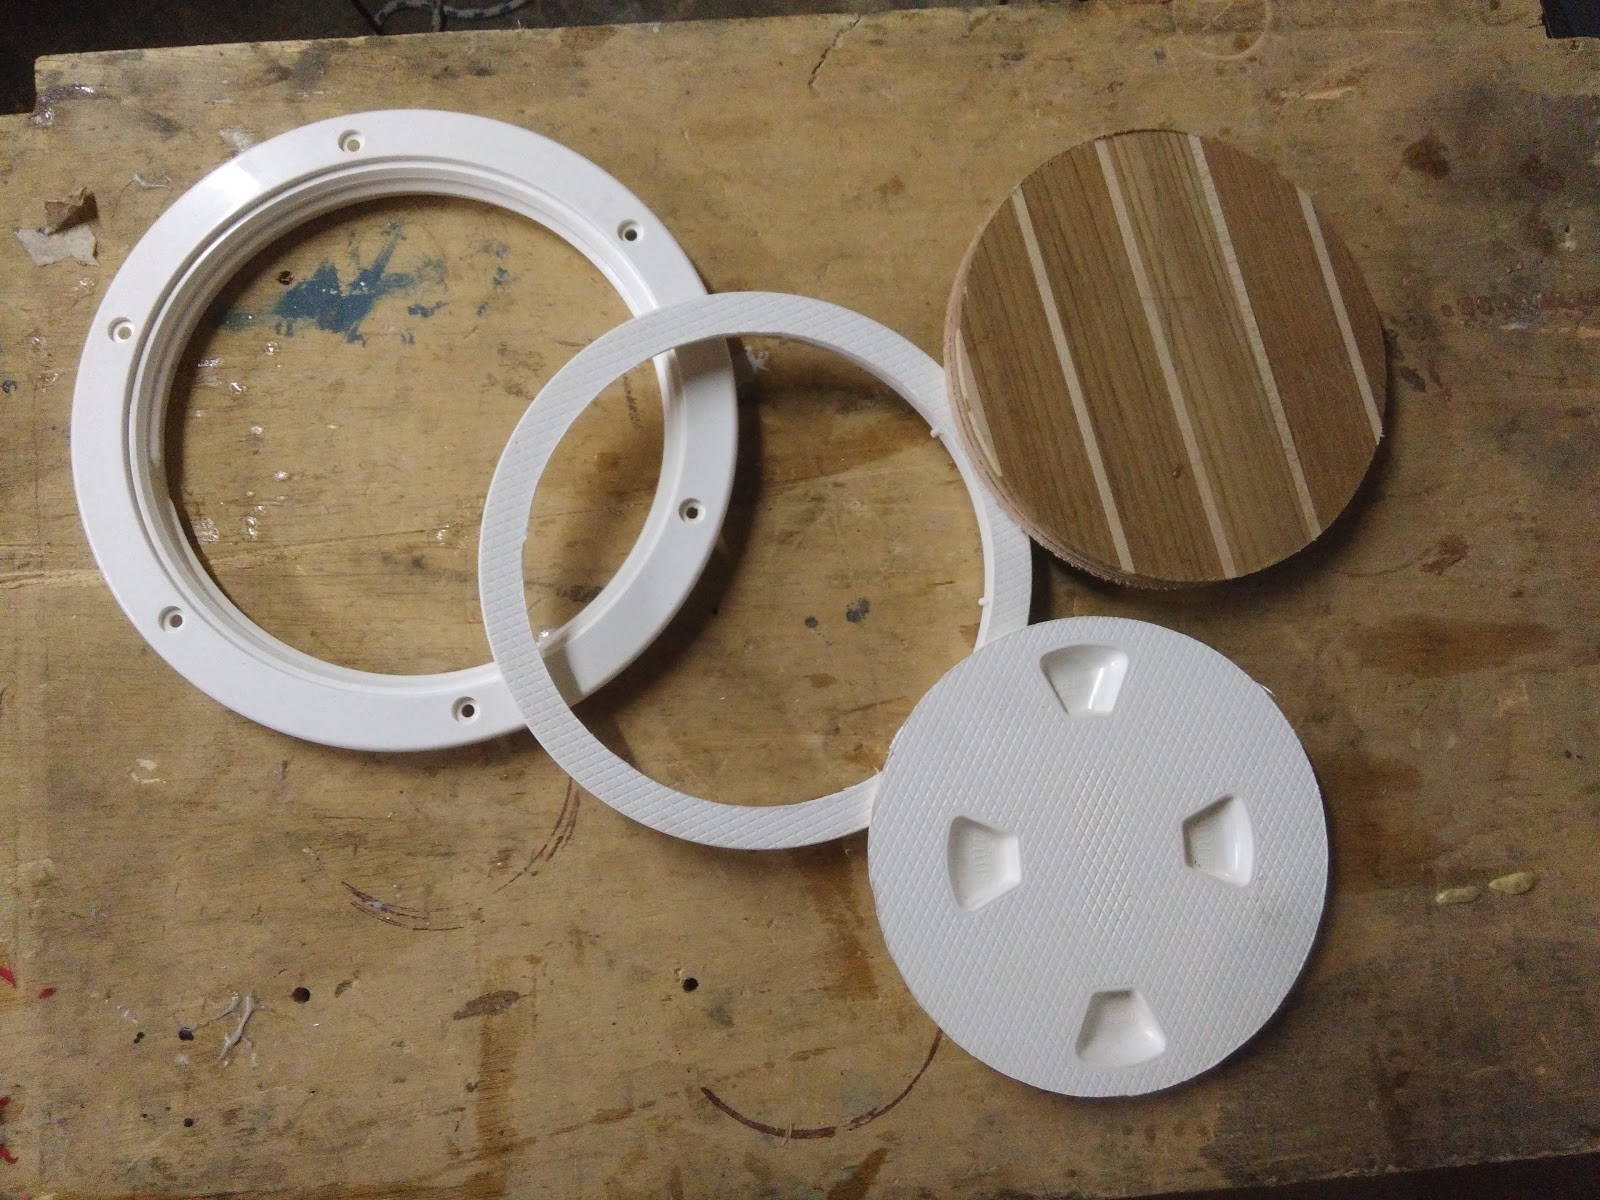
Customised deck plates

Over the past few days I have glued the deck over the bunk flat. Access to storage below is granted through 2 8 inch deckplates each side of the centercase and 2 6 inch ones under the foredeck. I purchAsed Beckson branded deckplates as suggested by my friend Steve who has used them on Spartina for years now. They indeed look sturdy and very high quality. However I couldnt help modifying them as they looked too plasticky on the teak deck. I therefore decided to cut away the core of the lid with the help of Christophe and the work place's lathe. The core part is replaced by the deck's cutaway that is carefully routered off to match the diameter of the hole in the deckplate's lid.

Luckiky I managed a tight fit between the parts and a generous epoxy fillet from the inside of the lid ensures mechanical integrity and watertightness.
I will just have to figure out the best way to produce finger notches to help screw/unscrew the deckplate in position.

Tuesday, 12 January 2016

An intense week's progress

Last week Christophe a good friend of mine decided to lend a helping hand and thrust the project forward as my april deadline is starting to loom higher above my head.... It is nice to be able to count on a friend like him.
With his help, many things were accomplished. The keel and homemade inboard "saildrive" have been installed. The saildrive's built into the skeg which needs to be about 60mm deeper than originally designed by John.
This extra height is carried along the whole boat's hull, and at the bow the original height is reestablished.

The laminated stem profile has been installed too, then followed a quick hull sanding and turn back upwards.
Since I'm pressed with time and wanted to maximise the opportunity of having some help at hand I decided to turn the hull unpainted and concentrate on finishing the inside of the boat.
I will paint the hull turned upright scheduling the coats and drying times in the evenings leaving it to dry during the time I'm away for work.

Progress on the inside of the boat saw us first paint light grey the underneath of the bunkflat and cockpit lockers. The paint has been painstakingly slow to dry, perhaps down to cold(ish) weather, incompatibility with the epoxy underneath or bad initial stirring. I might be responsible for the latter two possible causes....
Once the paint dry (ish) we installed a flexible water tank that will be used to store fresh water; an electric pump draws water from the 55l tank and feeds a small shower head.

I also built a small compartment for an electric bilge pump. Pathfinder is not designed with provision for a bilge pump but I decided to install one for when the boat is sitting at a mooring in case of rain. Also since in the summer we tend to jump in and out of the Mediterranean waters all the time, quite a lot of it is splashed back into the boat.... that plus the fresh water shower makes for some water to get rid of.

The bilge pump compartment is built at the center of the boat and uses the centerboard case side and  bulkhead  3 aft as confining walls;  two extra sides are added to provide an enclosed chamber where the pump sits. The inside is epoxied and fiberglassed. The bilge collects water from a strainer in the bunkflat and from the cockpit through a pipe in the main twarth locker.
It is positioned were according to the drawings the lowest (deepest) part of the hull is located. Since it is the first time I see this done on a Pathfinder I'm not entirely sure it'll work as intended, we'll see.

The teak strips have been glued to the cockpit floor, as well as the starboard bench.


Finally I had a go at installing the inboard motor now that the saildrive and its drive belt are firmly in position ....


.... a long week, I was well exhausted on sunday evening. Thanks Christophe for all of your help and time!