If one of my free time interests involves "things that go over the sea", such as the boat that is in the building and described in this blog, my professional activity leads me to explore what lies beneath the surface.
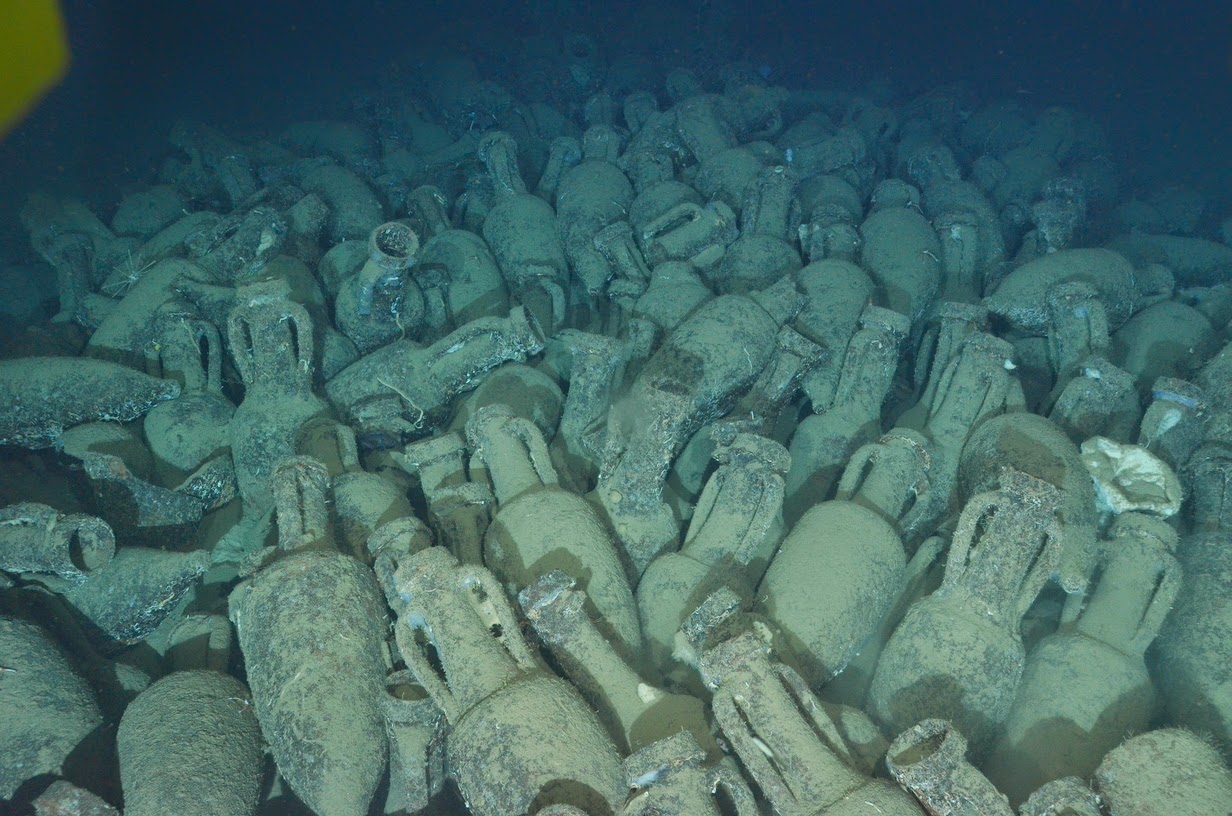
It was during one of these work appointments last month that I had the chance to dive an underwater vehicle over a fantastic archeological site.
These are the remainings of a roman ship that foundered near our coast around 2000 years ago. Its cargo of anphoraes still lined up as they were originally loaded indicates that the vessel sunk pretty much level.
Flying over these artifacts one's imagination runs fast .... and mine surely did. It was an incredible experience and naturally my thoughts went to the the people who built the ship, the anphorae and carried them around the mediterranean sea. The wreck site is a couple of miles from the coast and I do hope they managed it to dry land, however sadly the prospects for that happening are not that good.
Luckily for us today this is a protected (and deep) site therefore this beautiful display of craftmanship and endeavour will last for a few generations more....
Tuesday, 14 April 2015
Sunday, 1 March 2015
New wheels
I have recently acquired a new old trailer from an old new friend whom I met only a few months ago during the VeLa raid gathering in Venice. Felix is a thoroughly interesting man, an extremely kmowledgeable sailor and explorer of many iconic and less known places around the Mediterranean.
He's a great friend and extremely fun to be with.
I purchased this trailer from him and took it back to France where it originally came from. In its previous life the beast of a trailer, which measures 7.4 x 2.4 m (!) and has a load capacity of 1000kg, used to carry a fiberglass trimaran.
In its current form it is clearly to big for my future Pathfinder, however given its modular construction it is actually a very easy job to adapt it to the right length and width. A colleague from work has proposed help and a welder to do up the very few welds necessary for the project. I will tackle this soon!
He's a great friend and extremely fun to be with.
I purchased this trailer from him and took it back to France where it originally came from. In its previous life the beast of a trailer, which measures 7.4 x 2.4 m (!) and has a load capacity of 1000kg, used to carry a fiberglass trimaran.
In its current form it is clearly to big for my future Pathfinder, however given its modular construction it is actually a very easy job to adapt it to the right length and width. A colleague from work has proposed help and a welder to do up the very few welds necessary for the project. I will tackle this soon!
Helping hand
The pathfinder portrayed in this blog is my third build overall. The project is sure bigger in size than the previous ones I have tackled but I can finally count on some well appreciated help from my son. He's the new epoxy master, mixing the magic stuff for daddy and getting the required thickness with the right amount of powder additives.... it's great to be able to count on such help, thank you Emilio!
Sunday, 22 February 2015
Stringent matter....
.... the stringers that is!
Work on glueing the stringers has started. I decided not to screw them into the frames as the designer suggests because my frames are made out of a simple thickness of ply so there is not enough material for the screw to bite into. For the same reason the risk of splitting the frame would be high.
I have rather used thickened epoxy and short lengths of glass tape set in epoxy to bind the stringers to the frames and keep them securely in place. The result is very satisfactory.... tough, sturdy and no screw heads to negotiate when beveling stringers and planks.
I followed fellow pathfinder builders lead and split the stringers in half for short lengths at strategic locations where the bend was such that things were getting a little too strained for my likely . Alos the setting up required liberal use of powerful clamps ....
I will stop at two stringers each side to allow dry fitting the bunkflat and seat tops before carrying on glueing the remaining top two stringers each side...
Work on glueing the stringers has started. I decided not to screw them into the frames as the designer suggests because my frames are made out of a simple thickness of ply so there is not enough material for the screw to bite into. For the same reason the risk of splitting the frame would be high.
I have rather used thickened epoxy and short lengths of glass tape set in epoxy to bind the stringers to the frames and keep them securely in place. The result is very satisfactory.... tough, sturdy and no screw heads to negotiate when beveling stringers and planks.
I followed fellow pathfinder builders lead and split the stringers in half for short lengths at strategic locations where the bend was such that things were getting a little too strained for my likely . Alos the setting up required liberal use of powerful clamps ....
I will stop at two stringers each side to allow dry fitting the bunkflat and seat tops before carrying on glueing the remaining top two stringers each side...
Monday, 16 February 2015
Sticky Ketchup
Here is an idea I had once completely annoyed of handling the big cans of epoxy and their fiddling pumps for mixing small batches of resin.
I received a brand new 5l 2 pack epoxy system for Christmas (what better gift one can get?) and since the cans are full to the brim it is a bit of a handful sometimes to prepare small batches of the magic potion.
Therefore I cleaned up two bottles of Heinz' best and filled them with resin and hardener (one each, separately!)
It makes for much more handy pouring over the yogurt pot on the scales. Also these bottles have a drip stop rubbery seal that works marvel to avoid spillage and the odd drop that escapes and makes the workbench forever sticky.
My son burst into loud laughter the first time he saw them saying "Dad look!!! blue and yellow ketchup!!"
... I might have to add warning signs on them!!!
I received a brand new 5l 2 pack epoxy system for Christmas (what better gift one can get?) and since the cans are full to the brim it is a bit of a handful sometimes to prepare small batches of the magic potion.
Therefore I cleaned up two bottles of Heinz' best and filled them with resin and hardener (one each, separately!)
It makes for much more handy pouring over the yogurt pot on the scales. Also these bottles have a drip stop rubbery seal that works marvel to avoid spillage and the odd drop that escapes and makes the workbench forever sticky.
My son burst into loud laughter the first time he saw them saying "Dad look!!! blue and yellow ketchup!!"
... I might have to add warning signs on them!!!
Thursday, 29 January 2015
All the vertical bits attached to the big flat bit.....
... as technically well explained in the title, all the vertical components of the hull's structure are now permanently fixed (glued and screwed) to the boat's flat bottom. It is great to see the hull shape taking shape.
Now I have to move on towards beveling the bottom chine stringer.... For the first time in the build I frankly have no idea how to get on to do that. I've read people have used sanding disks on angle grinders, chisels, block or electric planes. I had initially devised a plan using a router guided along a wide batten acting as plank no 1 (see pict above). I think it is still a good idea but my router is too big for the plan to work as intended. I can't see either how a block or power planer could be used as the bevel needs to be cut all the way to the edge of the bottom board... I have purchased a rabbet plane and while waiting for the delivery man, I'll keep on pondering....
Sunday, 14 December 2014
Gone 3D...
Here we go, got a couple of days off work to concentrate on the Pathfinder project and soon enough the full 3D beauty of this boat design became apparent.
All the components were already built and prepared: floor, frames, centercase assembly, stem girder, cockpit seat sides, transom. They were already finished with doublers and floors already fixed to them.
The strongback took a little to build and check for proper alignment. As soon as the floor was "draped" on it, it became clear that the alignment of the supports was spot on as the curved floor leaned naturally on all ten of them. Only one support required a millimeter adjustment.
This result wouldnt have been possible, or as easy to obtain without my brand new laser cross light projector. I would really recommend it to all home boatbuilders out there. Mine is made by Bosch and cost below 50 euros. The laser cross is invaluable to check for correct alignment and verticality.
I managed to glue into place the bottom chine stringer wich required some persuadion in order to follow the curved floor edge. Then the centerboard case was epoxied in, then all other components placed and screwed into place; next step would be glueing them permanently.
Ortogonality was checked several times over with the laser light, as well as the spacing between the frames measured countless times. I am not sure I followed John's instructions to the letter, and rather followed what I felt would be the more logic, or easy, way to sequence up the different phases of the assembly. Also in all honesty, in the excitement of seeing the boat taking shape I completely forgot to look at the building instructions....
The result is very pleasing. I find myself staring at the boat's structure for long periods of time, imagining the next steps, the customised solutions I have in mind and then all the way to the first sail onboard her. It's going to be, and it already is and has been, a fantastic journey!
All the components were already built and prepared: floor, frames, centercase assembly, stem girder, cockpit seat sides, transom. They were already finished with doublers and floors already fixed to them.
The strongback took a little to build and check for proper alignment. As soon as the floor was "draped" on it, it became clear that the alignment of the supports was spot on as the curved floor leaned naturally on all ten of them. Only one support required a millimeter adjustment.
This result wouldnt have been possible, or as easy to obtain without my brand new laser cross light projector. I would really recommend it to all home boatbuilders out there. Mine is made by Bosch and cost below 50 euros. The laser cross is invaluable to check for correct alignment and verticality.
I managed to glue into place the bottom chine stringer wich required some persuadion in order to follow the curved floor edge. Then the centerboard case was epoxied in, then all other components placed and screwed into place; next step would be glueing them permanently.
Ortogonality was checked several times over with the laser light, as well as the spacing between the frames measured countless times. I am not sure I followed John's instructions to the letter, and rather followed what I felt would be the more logic, or easy, way to sequence up the different phases of the assembly. Also in all honesty, in the excitement of seeing the boat taking shape I completely forgot to look at the building instructions....
The result is very pleasing. I find myself staring at the boat's structure for long periods of time, imagining the next steps, the customised solutions I have in mind and then all the way to the first sail onboard her. It's going to be, and it already is and has been, a fantastic journey!
Subscribe to:
Posts (Atom)


